Mohamed Abbas | Architect Magento | Tech Blogger | Magento Trainer
Complete Tutorial of Git and GitHub for Basic to Advanced
Ever wondered how teams of computer programmers keep their projects organized and running smoothly? The secret lies in a process called source code management. Let’s explore how it works and why it’s essential for building software effectively.
What is Source Code Management?
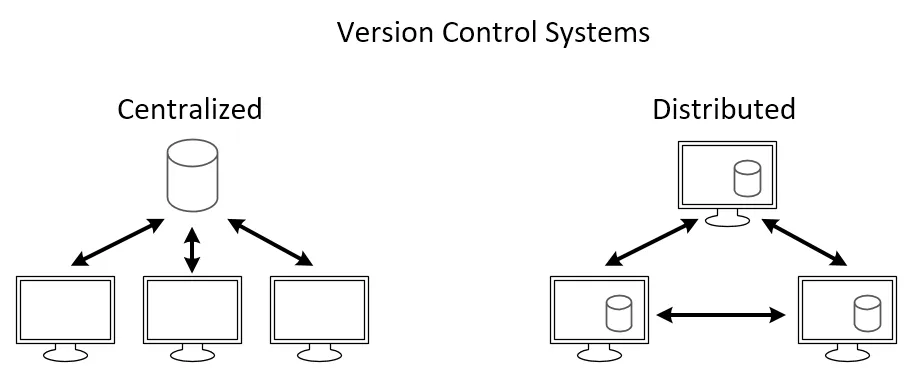
Source Code Management (SCM) acts as a digital filing system for computer code, enabling developers to collaborate seamlessly on projects. It keeps track of every change made to the code, stores different versions, and allows multiple people to work on various parts simultaneously. SCM also provides a clear record of who made changes and when, ensuring transparency and accountability. Tools like Git are widely used for managing code changes efficiently, streamlining teamwork, and fostering collaboration.
Types of Source Code Management
Source Code Management systems are broadly categorized into two types: Centralized and Distributed.
1. Centralized Source Code Management
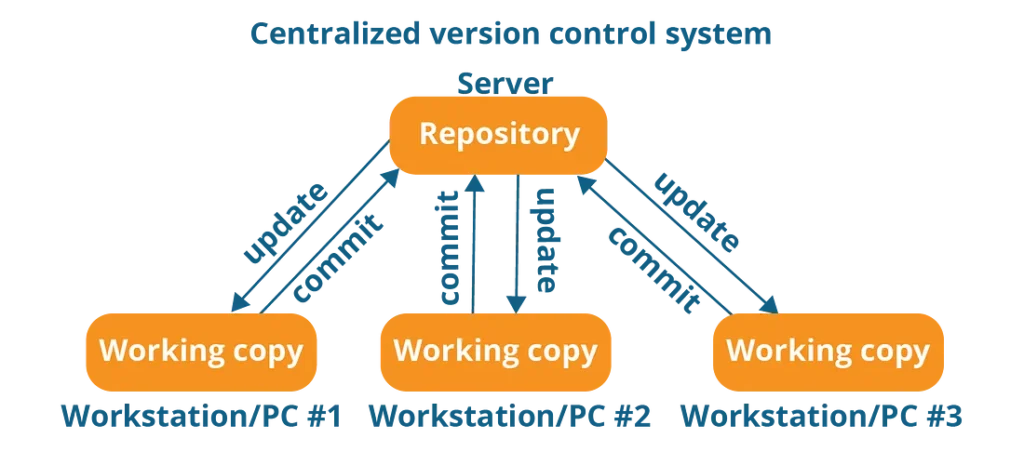
In centralized SCM, a central server stores the code repository, and developers check out the code from this central location to work on it.
Benefits of Centralized Source Code Management
Simplified Collaboration: All project code is stored in a single location, making it easier for teams to collaborate.
Access Control: Centralized systems allow for controlled permissions, ensuring only authorized developers can make changes.
Change Tracking: They maintain a clear history of all changes made to the repository, enhancing transparency.
Drawbacks of Centralized Source Code Management
a. Single Point of Failure: The central server serves as a single point of failure. If it goes down, developers lose access to the repository until the issue is resolved.
b. Limited Offline Access: Developers must be connected to the internet to access the central repository, making offline work challenging.
c. Complex Branching and Merging: Managing branches and resolving merge conflicts can be more difficult, particularly in teams with multiple developers working on different features.
Distributed Source Code Management
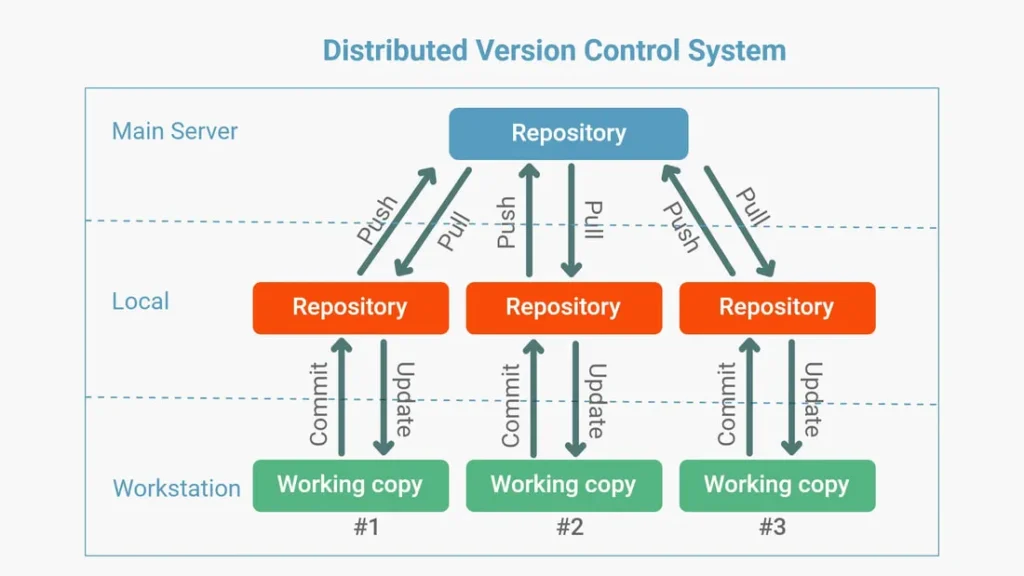
In distributed SCM, every developer has a local copy of the entire repository, including its history. Developers work independently on their local copies and share their changes by pushing to a central server or directly collaborating with other developers. Tools like Git and Mercurial are widely used examples.
Benefits of Distributed Source Code Management
Distributed Source Code Management (DSCM) provides several advantages over centralized systems:
Flexibility: Developers can work offline and independently using local copies of the repository. This allows them to experiment, make changes, and test features without impacting the central codebase.
Enhanced Collaboration: DSCM enables developers to share changes directly with one another, bypassing the need for a central server. This fosters more efficient collaboration, particularly for distributed or remote teams.
Reduced Internet Dependency: With a complete repository stored locally, developers can continue working offline and synchronize their updates later, minimizing the reliance on a consistent internet connection.
In this blog, we’ll dive into Git, a leading distributed version control system, and its companion platform, GitHub, which provides online storage and powerful collaboration tools for managing code projects.
What is Git?
Git is a powerful version control system that helps developers track changes made to their code over time. Think of it as a “time machine” for your projects, allowing you to review previous versions, identify changes, and collaborate seamlessly with others. It ensures that every modification is recorded, making it easier to manage and coordinate development efforts, whether you’re working alone or as part of a team.
To install Git, click here to go official Git installation page.
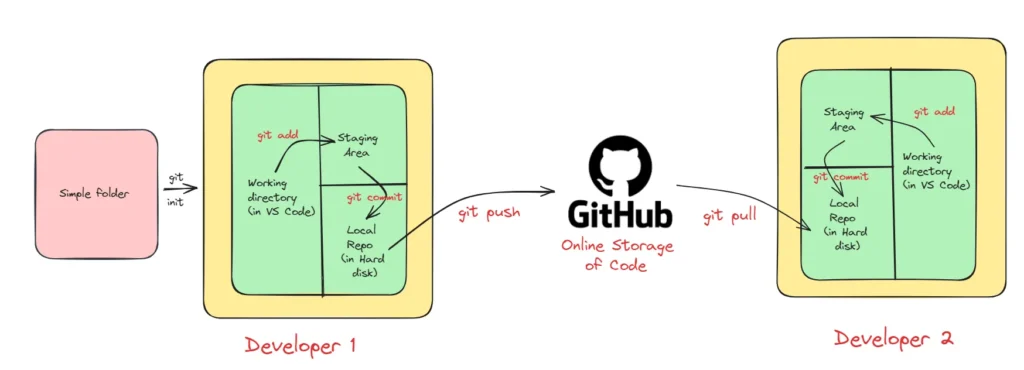
Understanding the Git and GitHub Workflow
The image shared illustrates the typical workflow when using Git alongside GitHub, a widely-used platform for managing software development projects. Here’s a breakdown of the key components and processes:
Local Repository:
Your project files are stored in a folder on your computer. This is your personal version of the repository.Working Directory:
The workspace where you actively make changes to your project files within the local repository.Staging Area:
A temporary space where you prepare and organize changes before committing them.Commit:
A snapshot of your changes saved permanently in the local repository. Each commit includes a message describing the changes and is tracked using Git’s SHA-1 checksum system for integrity.Local Repository (on your hard disk):
This stores all your commits and their history locally on your computer.GitHub Repository:
An online copy of your local repository hosted on GitHub’s servers. It facilitates collaboration and sharing of code.Push:
Uploads your commits from the local repository to the GitHub repository, ensuring your changes are available online.Pull:
Downloads the latest updates from the GitHub repository to your local repository, enabling you to stay in sync with others’ contributions.
This workflow allows seamless version tracking, collaboration, and code sharing, ensuring a smooth development process for teams and individuals.
Live Demo of Git :
1)Create a folder at your desired location (in my case I made demo folder).

2. Open this terminal inside VS code and in VS code terminal type git init.

3. Now create a file ( in my case I create demo.txt) and add in file something.

4. In terminal type git add . and check status by git status. Congratulations, you add your file in staging area.

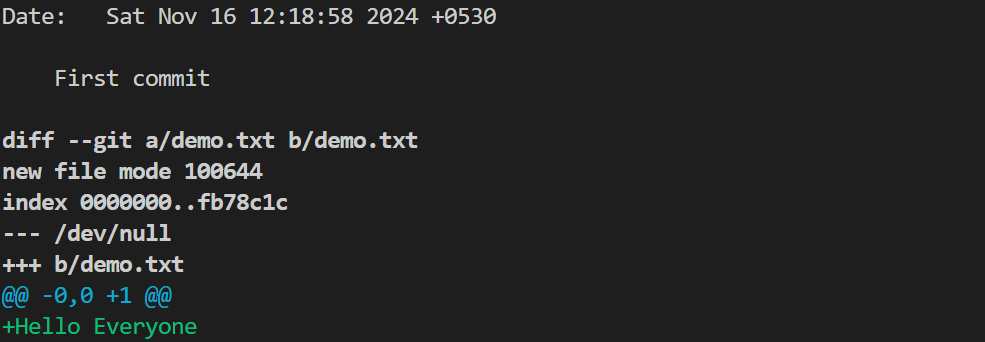
5. Now Commit this file by using :
git commit -m "First commit"
When you type this command and press enter, you will see the following screen :

Congratulations, you commit your first file, i.e. it save in you local repo.
6. Now if you want to upload on GitHub(Before this please create your account on GitHub and create there a new repository), and in terminal type below code :
					git remote add origin https://github.com/abbasm492/demo.git
git branch -M main
git push -u origin main
Congratulations, your files are reaching at GitHub.

Important Terminology:
git log:
This command provides a detailed history of commits in a repository. It displays information such as:
- Commit Messages: Descriptions of the changes made.
- Author: The person who made the commit.
- Timestamp: The date and time the commit was created.
By using git log, developers can track the project’s evolution, review changes, and identify specific contributions, making it an essential tool for understanding the development process.

git show : With this command, developers can view detailed information about a specific commit, including changes made to files, providing insights into what was modified and why.
.gitignore File
The .gitignore file is used to specify files and directories that Git should intentionally ignore. These might include:
Temporary Files: Such as logs, caches, or editor backups.
Build Artifacts: Files generated during the build process, like compiled binaries or distribution packages.
By excluding these files, the .gitignore file:
Prevents unnecessary files from being committed to the repository.
Keeps the repository clean and focused on essential project files.
This helps maintain a streamlined and organized version control process.

Git Branch
A Git branch is a separate line of development within a Git repository. It enables developers to work independently on specific tasks—such as new features, bug fixes, or experiments—without impacting the main codebase.
Key features of Git branches:
- Distinct Sets of Changes: Each branch represents a unique set of modifications, isolated from others.
- Parallel Development: Teams can work on multiple branches simultaneously, streamlining collaboration.
- Flexibility: Developers can create, switch between, merge, or delete branches as needed.
- Experimentation: Branches allow safe exploration of new ideas without risking the stability of the main codebase.
- Testing and Review: Changes can be isolated in branches for thorough testing and review before being merged.
Branches are an essential tool for managing workflows, ensuring the main codebase remains stable while development progresses.
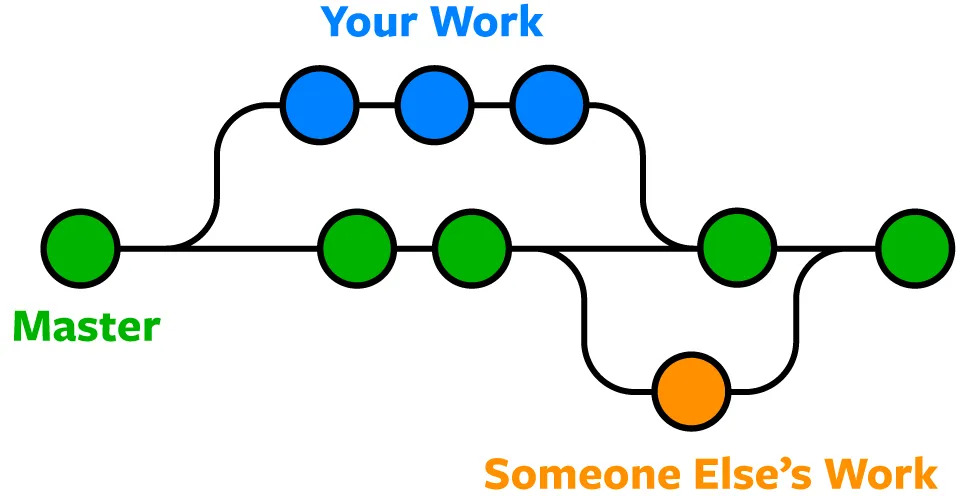
Git Workflow Breakdown:
Create a Branch:
Begin by creating a new branch from the master branch. This provides a copy of the main codebase where you can work on your changes without affecting the primary project.
Make Changes:
In your local branch (often labeled “Your Work”), you make the necessary modifications or additions to the code.
Commit:
Once you’re satisfied with your changes, you commit them to your local branch. This creates a snapshot of your progress, saving your work at that specific point in time.
Push:
After committing your changes, you push the branch to a remote repository (e.g., GitHub). This creates a remote version of your local branch, making it available to others for review and collaboration.
Pull Request:
When you’re ready to merge your changes into the master branch, you create a pull request. This notifies the team of your changes and allows them to review your work before merging it into the main codebase.
Merge:
If your changes are approved, they are merged into the master branch. This integrates your work into the stable, production-ready codebase, making it part of the main project.
This workflow ensures a structured, collaborative process for working with Git, making it easier to manage features, fixes, and experiments while keeping the main codebase stable.
Some important Commands :
					# To see list of available branches
git branch

# To Create new branch
git branch <branch name>

# To switch branch
git checkout <branch name>

# Files created in workspace will be visible in any of the branch workspace
# untill you commit. Once you commit, then that files belongs to that particular
# branch.
git merge :
Git merge is a command used to combine the changes from one branch (the source branch) into another (the target branch). When you merge, Git integrates the changes from the source branch into the target branch, resulting in a new commit that reflects both sets of changes.
Example:
Suppose you have two branches: main and features. You want to merge the changes from the features branch into the main branch. Here’s how to do it:
Switch to the Target Branch (main):
First, ensure you’re on the branch you want to merge into (in this case, main). You can switch to the main branch using the following command:
Switch to the Target Branch (main):
First, ensure you’re on the branch you want to merge into (in this case, main). You can switch to the main branch using the following command:
git checkout main
Merge the Source Branch (features):
Now, merge the changes from the features branch into main:
git merge features
In this way, you can merge one branch to other and after that you can push these changes to GitHub.
Conflicts in git merge :
Conflicts in Git merge occur when Git encounters changes in the files that conflict with each other during the merging process. These conflicts arise when: Both branches modify the same lines of code differently, and Git cannot automatically determine which changes to keep.
When conflicts occur, Git marks the conflicted areas in the affected files, indicating where the conflicting changes exist. It’s then up to the developer to resolve these conflicts manually by editing the files to incorporate the desired changes and remove any conflicting content.
To resolve conflicts, developers typically:
- Open the conflicted files in a text editor.
- Locate the conflict markers added by Git, indicating the conflicting sections.
- Edit the files to resolve the conflicts, choosing which changes to keep or combining them appropriately.
- Save the changes and stage the resolved files using “git add”.
- Complete the merge by creating a new merge commit using “git commit”.
git stash:
Git stash is a command used to temporarily save changes that are not yet ready to be committed. It’s useful when you need to switch branches but want to avoid committing unfinished changes or losing them. Stashing allows you to save your progress and return to it later.
When you run git stash, Git will:
- Save all changes in your working directory and staging area (index) as a “stash”.
- Reset your working directory and staging area to the state of the last commit, effectively removing the changes from view.
You can later retrieve the stashed changes with the git stash apply or git stash pop commands. This feature helps you manage your work-in-progress without cluttering your commit history or losing any work.
Important Command for git stash :
					# To stash an item
git stash

# To see the stashed items list
git stash list

# To apply stashed items
git stash apply stash@{number}

# To clear the stash item
git stash clear
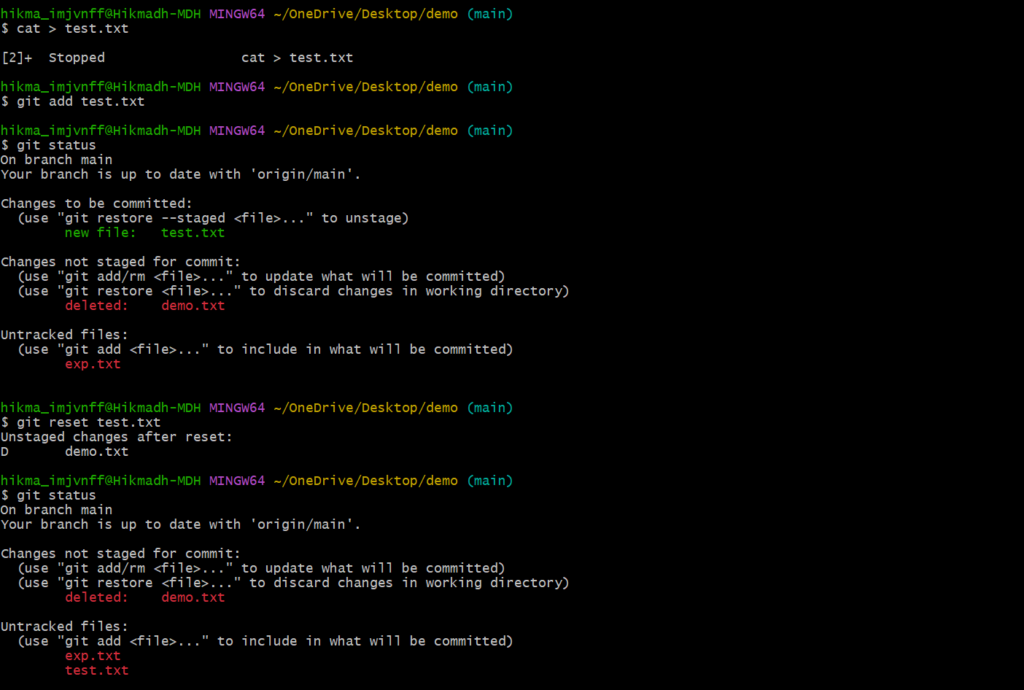
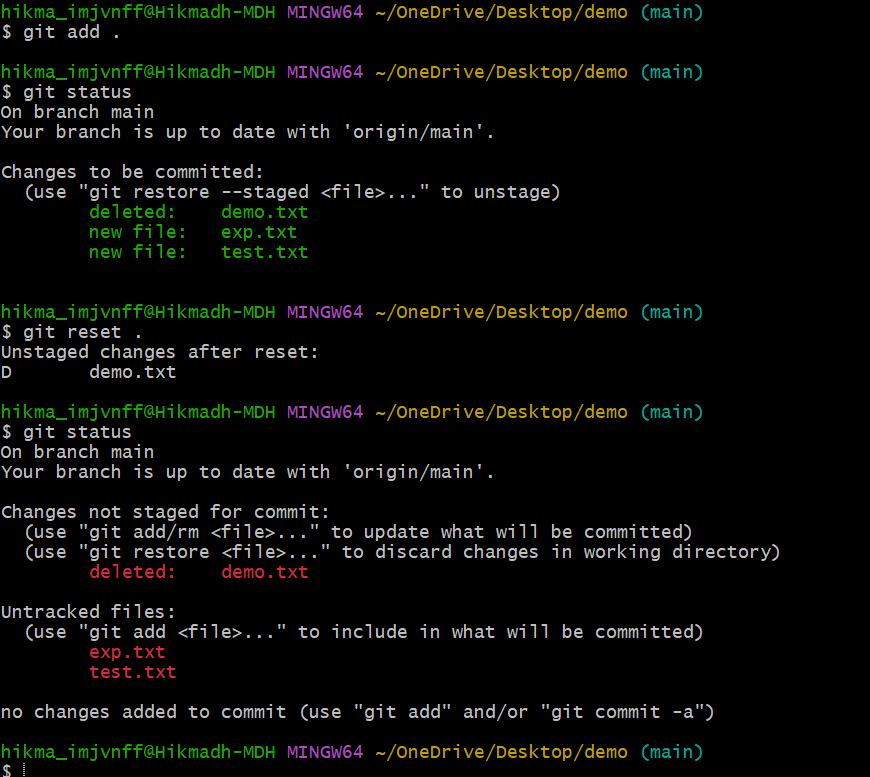
git reset:
Git reset is a command used to undo changes in your working directory or staging area. It allows you to move the current branch pointer to a previous commit, effectively resetting the state of your project.
					git reset <file name>
        or
git reset .
See the workflow of git reset :
git revert:
The git revert command is used to undo an existing commit without deleting any data. Instead of erasing history, it creates a new commit that reverts the changes made in the specified commit. This ensures that your version control history moves forward, while the state of your files is reverted to their previous state.
Unlike git reset, which can modify the commit history, git revert preserves the history by adding a new commit that undoes the changes. This makes it a safer option, especially when working in a shared repository, as it doesn’t rewrite history but rather appends a new commit that reverses the changes.
git revert <commit id>
Removing Untracked File :
					git clean -n   #(ask for delete yes or no)
git clean -f   #(forcefully)
Tags
It is used to gives meaningful names to a specific version in the repository.
					git tag -a <tag name> -m <message> <commit-id>

# To see the list of tags
git tag

# To see particular commit content by using tag
git show <tag name>

# To delete a tag
git tag -d <tag name>
I hope this blog has helped enhance your understanding of Git and GitHub concepts. If you found value in this content, feel free to follow me for more insightful posts. I appreciate you taking the time to read this article. Thank you!
